Wednesday, October 5, 2011

Creative Paperclay DT Project

 Be sure to scroll down and see how I was used.

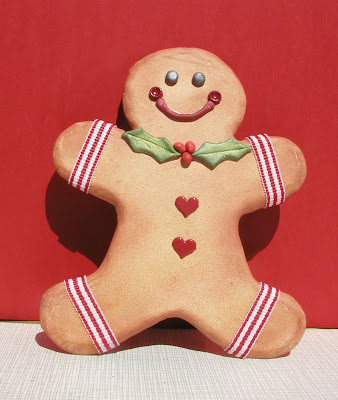
Gingerbread Man
 
This is the first time I have used Creative Paperclay.  And let me just say I am in love with this product!  It is so easy to use and the possibilities are endless.  It is so user friendly it would be a great craft medium for children too!


For my design team project I decided to make a gingerbread man.  I hope you enjoy it.

Instructions:
For a pattern I hand drew my gingerbread man (paper template) on cardboard.  But if you do not draw you can find chipboard images to trace around or a childs' coloring book is also a good source for simple clean line images.
1.) Take only the amount of paperclay out of package that you will be using. Be sure to seal the remainder back up so that it will remain pliable for future projects.
2.) Roll out on a flat surface either using wax paper or a craft mat underneath.  Also to help maintain an even thickness lay flat paint stir sticks about 7" apart, then place paperclay in between and use your rolling pen or  acrylic rod to flatten it keeping the rolling pen or acrylic rod on top of paint stir sticks. The thickness will be uniform this way.
3.) Carefully cut around the image with a craft blade.
4.)  Lift off pattern template and take the back of your fingernail and go all away around the design and blunt the top edge.  Lay aside to dry for 1 to three days.
5.) Next roll three small balls for holly berries and set aside to dry. Once dried, paint red.  Flatten out small pieces of paperclay and cut out a leaf shape and squeeze center slightly to resemble a holly leaf.  Make two. Lay aside to dry. Once dry paint green and highlight with light yellow.
6.) After gingerbread body has dried use Tim Holtz Tea Dye Distress Ink Pad with either a makeup sponge or color duster brush to apply color.  Dust entire cookie brown.  Go around edge and additional time or two to have a deeper color where it would look like the cooked cookie edge.
7.) For eyes roll small balls of clay flatten slightly and lay aside to dry.  Once dry paint desired color.
8.) Using a clay extruder make small piece for the mouth.  About 1" long, shape into smile and lay aside to dry.  Once dry, paint red.
9.) Assemble gingerbread man by gluing eyes, smile, holly leaves and berries to him in proper places. 
10.) Cut ribbon trim to length and glue around arms and legs.
11.) For buttons, I used metal heart shaped brads.  I cut brad part off and glued down with my favorite glue.  For all adhesion I used Aleene's Gold Bottle Craft Glue.

This little gingerbread man can be inscribed and a hanging cord added for a special Christmas ornament or package topper or added to a wreath or as I choose to do and add it to a rubber stamped sleigh filled with pine boughs and a floral cookie pick for a display piece. 

Also checkout Creative Paperclay blog http://www.creativepaperclay.blogspot.com/ for more great ideas!

Thursday, September 1, 2011

Viva Las Vegas Design Team Project

Hello again,
My friends and I get together to eat and watch "Dancing with the Stars" each season.  (as if we need a reason to eat)  This is the invitation I created for this year to invite them for a time of fellowship and fun.  I also decided this was what I was going to submit for my DT project.  My husband has named it "Designing with the Stamps" for my VLVS Design Team Project.  Isn't he clever?  Hope you enjoy it.  
 Stamp Credits:
Dancing Couple - Viva Las Vegas Stamps
Floor Lamp - Art Impressions 
Sofa (altered) -Stamp Me Tender
Tiny the Cat - All Night Media
Cupid Chick - Stampendous
Dog  (altered)- Winter is Calling Set, Stampin Up
Background Wallpaper Print - It's Snow Time Set, Stampin Up
"D" "W" "T" "S" - Alphabet Set - Stampabilities
Mouse, Bone, Hardwood Floor - Hand Drawn

Directions:
1.  Select white cardstock and cut to size.  Stamp dancing couple on RH side of cardstock.
2.  The sofa stamp will need to be lengthened since there is not enough room for 3 animals on the original sofa.  Turn sofa stamp over, rubber side up.  Ink 1/2 to 3/4 of image on RH side, being careful not to ink end where arm rest ends the couch.  Stamp to the left of the dancing couple. (you will only have 1/2 to 3/4 of sofa stamped at this point)
3.  Ink entire sofa stamp and stamp on clear acrylic and then using a stamp positioner align to sofa previously stamped on your cardstock.  When you get it aligned to the length of the sofa that you want, remove the clear acrylic piece leaving the stamp positioner in place and this will create your alignment for the sofa, so place your sofa stamp rubber side up and ink 1/2 to 3/4 of image on LH side, place stamp in stamp positioner and stamp remainder of sofa.  Your sofa will now be lengthened to accomodate your animals.  If the top back of your sofa is not perfectly aligned that will be OK as you will be putting an animal in the center of the sofa.  It is important to have the bottom aligned as there will not be anything covering it.  This may take a practice session to get used to aligning the sofa and learning just how much of the sofa stamp to ink up each time.
4.  Stamp lamp on the LH side of the sofa.
5.  Stamp chick, cat and dog on a separate sheet of white cardstock.  Add color by your favorite method.  I used markers and blender pens.  Cut each out with scissors. Lay aside.
6.  Chick stamp came with heart, in this case my score card,  in hand so I just wrote in my dance score on the heart.  The cat needed a score card so on a separate sheet of cardstock I hand drew a mouse (minus the tail) and colored. Cut the mouse out and for a tail tape a piece of string or embroidery floss on the back side.  I then wrote my dance score on the mouse's back. Lay aside. The dog had a tiny mitten in his mouth but it was not large enough to use for a score card so I drew a bone on a separate sheet of cardstock, colored, wrote in a score and then cut it out. Lay aside.
7.  Glue chick on LH side of sofa. Cut a small opening in cats mouth and insert mouse tail into opening and tape on back side of the cat to hold in place.  Glue cat to middle of sofa. (I left the mouse free moving to add interest to the invitation i.e. I did not glue it down) Glue small bone underneath dog mouth covering mitten that is in his mouth and glue to RH side of sofa.
8.  Draw in lines to represent hardwood floors. Color with colored pencils.
9.  Create mask for dancing couple and a reverse mask for the light beam and add color with chalk to represent spotlight.
10.  Carefully color in background.  I used chalk (very pale color). Then using a snow stamp I inked up with a very pale matching ink and randomly stamped a wallpaper print being careful not to stamp over any images.  You may create masks if concerned about getting ink on any of your images.
11.  Highlight a small area under lampshade to represent illumination from lamp.
12. Stamp "D" "W" "T" "S" on separate sheet of white cardstock, highlight behind letters, outline with silver pen, cut out and glue to card.
13.  Outline entire card with gold pen to create a finished look.
 Then I went to the computor and created my invitation text and cut out and adhered to the backside of my invitation.  Since I see all of these girlfriends I hand delivered. 
Also check out Viva Las Vegas Blogspot

Thursday, August 25, 2011

New Cards Created


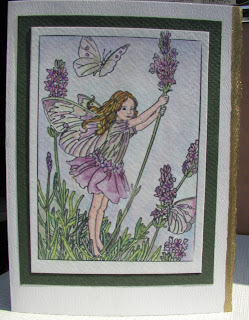
 This is a card I created using watercolor paper.  I needed to brush up on watercolor skills so this is the end result.
The Flower Fairy Rubber Stamp is by Stamps Happen, Inc.
It can be purchased at this link Flower Fairy Stamp
Also testing my hand at adding links.  Appears to work!
 This card was made using pigments inks on the background.  The background stamp was a Foliate Cube by Stampendous.  The love verse was stamped using Staz On black ink and colored in with markers. The Love Verse is a stamp by Stamps Happen, Inc.
I am adding this card to show the use of  Tim Holtz Alcohol Inks.  I had a fun day trying out many ways to use them. If you haven't visited his website it is well worth your time.  So many great ideas.  I will have to post a few more cards later.  The shell stamp is a stamp by Inkadinkado.  Okay the link isn't the exact shell stamp I used but would work just the same.  Hope you have enjoyed viewing them.


Tuesday, August 23, 2011

This is a card I submitted to Rubber Stamp Madness Magazine.  It was my first attempt at submitting artwork for publication.  It was not chosen but my perserverance paid off in the end because I did have a tag that I made chosen. It will be published in the Holiday 2011 issue.  I'm very excited about seeing it in print.
This is also my first attempt at a blogspot so please bear with me as I learn.